Clean rim jets in toilet maintenance is the “secret sauce” of a truly hygienic and high-performing bathroom. Most cleaning professionals focus on the bowl surface, but if the flush feels sluggish or the swirl is nonexistent, the problem is likely hiding just out of sight. Clogged rim jets prevent your toilet from clearing waste efficiently, which can lead to embarrassing “double-flushing” and bacterial growth. In this guide, we will break down the exact steps to restore your toilet’s power and ensure those hidden channels remain spotless.
Table of Contents
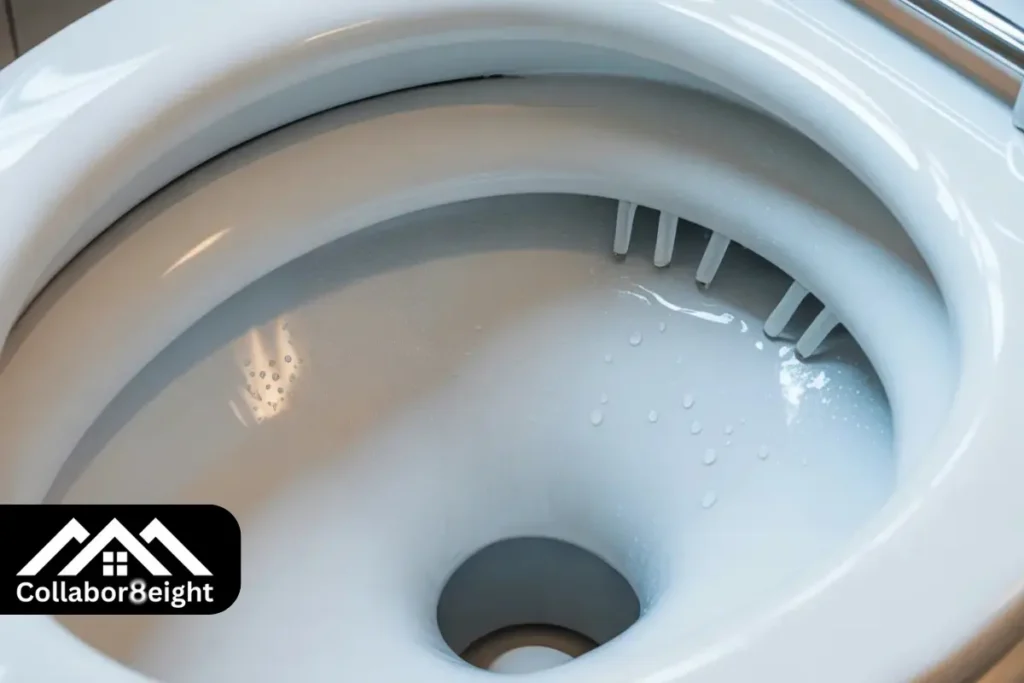
What Exactly Are Toilet Rim Jets?
Before you can effectively clean rim jets in toilet systems, you need to understand their anatomy. The rim jets are a series of small, angled holes located underneath the interior rim of the toilet bowl. When you press the flush lever, water rushes from the tank into the rim channel.
The jets serve two primary purposes:
- The Swirl: They direct water at a specific angle to create a centrifugal force, often called the “swirl,” which helps move waste toward the trapway.
- Bowl Rinsing: They provide a “wall wash” to ensure the entire surface of the porcelain is rinsed with every cycle.
Why You Must Clean Rim Jets in Toilet Regularly
For a professional cleaning service, a toilet that looks clean but flushes poorly is a job half-done. If you don’t clean rim jets in toilet setups, several issues arise. Over time, these small apertures become the perfect breeding ground for biofilms and mineral scale.
In regions with hard water, calcium and magnesium deposits (limescale) act like concrete, slowly narrowing the diameter of each jet. This reduces water velocity. Furthermore, the dark, damp environment under the rim is a sanctuary for Serratia marcescens (the pink/orange bacteria) and black mold. Ignoring these jets doesn’t just hurt performance; it compromises the sanitary standards of the facility.
Common Signs Your Rim Jets are Clogged
How do you know it’s time to perform a deep clean? You don’t need a plumber to diagnose a clog; you just need to observe the water’s behavior.
- Weak or Vertical Water Flow: Instead of a vigorous, angled swirl, the water simply “trickles” straight down the sides of the bowl.
- The “Lazy Flush”: The water level in the bowl rises significantly but takes a long time to evacuate, even if there is no blockage in the main drain.
- Visible Staining: If you see dark or orange streaks originating from under the rim, it’s a clear indicator that the jets are harboring colonies of bacteria.
- The Mirror Test: As a pro, you should carry a small hand mirror. Hold it under the rim to inspect the holes. If you see white, crusty deposits or dark gunk, it’s time to clean rim jets in toilet channels immediately.
Essential Tools for Professional Rim Jet Cleaning
To clean rim jets in toilet systems effectively, you need more than just a standard toilet brush. Professionals use a specialized kit to ensure every mineral deposit is removed.

- Handheld Mirror: To see exactly where the clogs are located.
- White Vinegar or Commercial Descaler: Acid is required to dissolve calcium.
- Duct Tape or Plumber’s Putty: Essential for “soaking” the internal rim channel.
- Small Wire or Allen Wrenches: Used for mechanical clearing of stubborn scale.
- Funnel: For pouring solutions into the overflow tube.
- PPE: Nitrile gloves and eye protection are non-negotiable when working with acidic cleaners.
Safety First: Chemical Compatibility for Cleaning Pros
When you prepare to clean rim jets in toilet units, you must be hyper-aware of chemical reactions. A common mistake is mixing vinegar (an acid) with bleach (a base). This creates toxic chlorine gas, which is lethal in small, unventilated bathrooms.
- Acid vs. Bleach: Never use them together. If you used a bleach-based cleaner in the bowl earlier, flush it out completely before introducing vinegar or a descaler.
- Porcelain Protection: Avoid using heavy-duty industrial acids (like high-concentration muriatic acid) unless absolutely necessary, as they can etch the porcelain and make it more susceptible to future staining.
Method 1: The Vinegar Soak (Eco-Friendly & Gentle)
If the mineral buildup is mild, the “Vinegar Soak” is the safest way to clean rim jets in toilet bowls.
- Heat the Vinegar: Warm 1–2 quarts of white vinegar. It doesn’t need to be boiling; “coffee hot” is sufficient to accelerate the chemical reaction with the calcium.
- Access the Overflow Tube: Remove the tank lid. Find the vertical tube in the center of the tank—this is the overflow tube.
- The Pour: Use a funnel to pour the warm vinegar directly into the overflow tube. This allows the vinegar to travel exactly where the water goes: into the rim channel and out through the jets.
- Dwell Time: Let it sit for at least 30 to 60 minutes. For severe cases, let it sit overnight.
Method 2: The Duct Tape & Descaler Technique (Advanced)
For cleaning service providers dealing with neglected commercial properties, the vinegar soak may not be enough. To clean rim jets in toilet fixtures with heavy calcification, you must increase the “dwell time” of the chemical agent. This is where the Duct Tape Technique becomes indispensable.
- Dry the Rim: Use a microfiber cloth to thoroughly dry the underside of the toilet rim. If the porcelain is wet, the tape will not adhere.
- Seal the Jets: Apply strips of high-quality duct tape or specialized masking tape along the entire underside of the rim, covering every single jet hole. Press firmly to create a watertight seal.
- Fill the Channel: Go to the tank and pour your descaling solution (or undiluted white vinegar) into the overflow tube. Since the jets are sealed, the liquid will back up and fill the entire internal rim manifold.
- The Saturation Phase: Allow the solution to sit for 2 to 4 hours. This forced immersion breaks down the bond between the limescale and the porcelain.
- The Reveal: Remove the tape and immediately flush the toilet. You will likely see large chunks of gray or white mineral scale break loose and fall into the bowl.
Method 3: Mechanical Clearing with Wire and Allen Wrenches
Sometimes, chemical solutions alone cannot penetrate “fossilized” minerals. To properly clean rim jets in toilet systems that have been ignored for years, a mechanical approach is required.
Using a small L-shaped Allen wrench or a piece of stiff coat hanger wire, gently poke into each individual jet hole. Professionals prefer the Allen wrench because the hexagonal edges help “scrape” the sides of the hole as you rotate it. Be careful not to use excessive force; your goal is to chip away the scale, not scratch the vitreous china. Once the physical blockage is broken, a follow-up flush will evacuate the debris.
Targeting Bacteria: Dealing with Black and Orange Rim Spots
While minerals are the main culprit for performance issues, bacteria are the main culprit for odors and stains. When you clean rim jets in toilet units and notice orange “slime” or black mold, you are dealing with organic growth.
The orange film is typically Serratia marcescens, a bacteria that thrives on fatty substances (like soap residue) and phosphorus. To kill these colonies, you must use a disinfectant that can reach the interior channel. After the descaling process, pouring a diluted bleach solution through the overflow tube (only after the acid is thoroughly rinsed!) will sanitize the “hidden” parts of the toilet that a brush can never reach.
The Role of the Overflow Tube in Deep Cleaning
The overflow tube is your “highway” to the rim. Many cleaners make the mistake of scrubbing the bowl but ignoring the tank-to-bowl delivery system. To effectively clean rim jets in toilet fixtures, the overflow tube must be free of debris. Ensure the small refill tube (the thin rubber hose) is properly clipped to the top of the overflow tube. If this tube is displaced, the rim channel doesn’t receive enough water during the refill cycle, leading to “dry spots” where minerals can settle more easily.
Professional Maintenance Schedule for Cleaning Services
To provide the best value to your clients, you should incorporate a rim-jet inspection into your quarterly deep-clean rotation.
- Weekly: Standard bowl scrubbing with a focus on the rim’s underside.
- Monthly: Use the mirror test to check for early mineral “crusting.”
- Quarterly: Perform a vinegar flush via the overflow tube to clean rim jets in toilet systems before they clog.
- Annually: Conduct the Duct Tape Method for high-traffic commercial accounts.
Preventing Future Clogs: Water Softeners and Tank Treatments
The best way to clean rim jets in toilet bowls is to prevent them from getting dirty in the first place. For clients with chronic hard water issues, suggest the installation of a point-of-entry water softener. If that is not an option, recommend in-tank cleaning tablets that are specifically labeled as “Safe for Valves.” Avoid cheap bleach tablets that can degrade the flapper and seals; instead, look for citric-acid-based drop-ins that help maintain a clear flow through the rim jets with every flush.
Pro Tips: Expert Insights for Cleaning Professionals
The Hot Water Hack: For faster results, use a 50/50 mix of boiling water and vinegar. The heat significantly accelerates the breakdown of calcium carbonate.
The Vacuum Method: If you suspect a jet is clogged with a solid object (like a piece of a broken tank bolt), use a wet/dry vac with a crevice tool. Create a seal against the jet hole to suck the debris outward rather than pushing it further in.
Mirror Documentation: For commercial cleaning contractors, take a “before and after” photo using your hand mirror. It proves to the client that you are performing high-level maintenance that goes beyond “surface clean.”
“Maintenance is the most overlooked factor in solar performance. Dust, bird droppings, and pollen create a layer of ‘soiling’ that blocks sunlight from reaching the photovoltaic cells. To understand the impact of debris on your system, read our guide on Solar Panel Cleaning: Boost Energy Output by 30%, which breaks down how a simple cleaning routine can dramatically improve your ROI.”
Final Thought: Restoring Performance and Hygiene
Learning how to clean rim jets in toilet systems is an essential skill for any elite cleaning service provider. By understanding the relationship between the overflow tube, the rim channel, and the jets themselves, you can solve “weak flush” problems that frustrated homeowners often assume require a full toilet replacement. Regular descaling and mechanical clearing ensure a powerful, hygienic swirl that keeps bathrooms smelling fresh and looking spotless.
Ready to upgrade your cleaning kit? Start by adding a telescopic mirror and a gallon of high-concentration white vinegar to your van today. Your clients will notice the difference in their toilet’s performance immediately.
How do I know if my toilet rim jets are clogged?
If the water flows straight down rather than swirling, or if the flush feels “weak” despite the tank being full, your rim jets likely have mineral buildup.
Can I use bleach to clean rim jets in toilet systems?
Bleach is excellent for killing mold and bacteria (the black/orange stains), but it will not dissolve the hard water minerals that cause clogs. Use vinegar or a descaler for clogs.
Why does my toilet have black spots coming from the rim?
These are typically mold or mildew colonies living inside the rim channel. To fix this, you must clean rim jets in toilet systems using a disinfecting solution poured through the overflow tube.
Will a wire hanger damage my toilet?
If used gently, a wire or Allen wrench is safe. However, avoid aggressive scraping on the visible parts of the porcelain to prevent permanent grey marks.
How often should a cleaning service clean rim jets in toilet units?
For commercial properties, a deep rim-jet cleaning should be performed every 3 to 6 months depending on the local water hardness levels.