
Why Removing Your GE Washer Agitator Matters
If you’ve ever noticed your clothes not getting cleaned properly or your GE washer making strange noises, the culprit might be the agitator. Learning how to remove agitator from GE washer can save you time, frustration, & even a service call. Whether it’s for cleaning, repairing, or replacing worn parts, getting the agitator out is the first step toward fixing your washer & keeping it running smoothly.
Don’t Worry, It’s Easier Than It Sounds
Before you roll up your sleeves, let’s be honest—removing an agitator might sound tricky. But with the right approach, it’s something most homeowners can do themselves. Think of it as giving your washer a little TLC. You’ll feel proud knowing you tackled a job that seems complicated but is actually very doable.
Understanding Your GE Washer Agitator
Your GE washer agitator is that central post in the drum that moves your clothes around during the wash. Over time, it can get clogged with debris, softener buildup, or even bits of clothing that escaped the drum’s grasp. If it’s worn out or damaged, your washer won’t work as efficiently, & your clothes might come out dirtier than you’d like. That’s why knowing how to remove agitator from GE washer is so valuable.
The Benefits of Doing It Yourself
By learning this simple yet crucial skill, you can inspect the agitator dogs, clean hidden nooks, & even replace broken parts—all without paying someone else to do it. Imagine the satisfaction of seeing your washer spinning like new again, & knowing you made it happen with your own hands. Plus, doing this yourself saves money & teaches you a little about how your washer actually works.
What You’ll Learn in This Guide
In this article, we’ll guide you step by step through how to remove agitator from GE washer, covering everything from safety tips to troubleshooting stubborn bolts. You’ll also learn how to inspect & clean the agitator, & even get tips on maintenance to prevent future problems. By the end, you’ll not only understand your washer better but also feel confident handling small repairs on your own.
Safety First: Precautions Before Starting
Why Safety Matters
Before you dive into how to remove agitator from GE washer, it’s crucial to put safety first. Your washer might look harmless, but those bolts, edges, & electrical components can be dangerous if handled carelessly. Taking a few extra precautions now can prevent cuts, shocks, & a lot of frustration later.
Unplug the Washer
The very first thing you should do is unplug your GE washer. Sounds simple, right? But it’s easy to forget in the excitement of starting a DIY project. Cutting the power ensures that nothing accidentally turns on while you’re working on the agitator. Your hands, clothes, & washer drum will thank you.
Wear Protective Gear
Grab a pair of sturdy gloves & maybe even safety glasses. Those agitator bolts can be stubborn, & parts might slip or spring out unexpectedly. Gloves protect your hands from scrapes, while glasses guard against flying debris.
Clear Your Workspace
Give yourself plenty of room to work. Move laundry baskets, cleaning supplies, & pets out of the way. Having a clear workspace means fewer accidents & easier maneuvering when lifting the agitator out of the drum.
Use the Right Tools
Don’t try to muscle your way through with random tools. Using a proper socket wrench, screwdrivers, & pliers will make the job much smoother & safer. When you’re ready to tackle how to remove agitator from GE washer, the right tools are your best friends.
Check for Model-Specific Warnings
Different GE washer models can have slight variations in design. Before starting, take a look at your washer’s manual or online guides to see if your model has any specific safety notes. Being aware of these small differences can prevent costly mistakes.
Double-Check Everything
Before you start removing the agitator, make sure the washer is fully off, unplugged, and that you have all tools ready. A quick double-check can save you from surprises halfway through the process.
Tools & Materials You’ll Need
Why Having the Right Tools Matters
Before diving into how to remove agitator from GE washer, it’s important to gather the right tools & materials. Using proper equipment not only makes the job easier but also keeps you safe. Imagine trying to remove the agitator with the wrong wrench—it’s frustrating, slow, & could damage your washer. Let’s set you up for success from the start.
Essential Tools for the Job
Here’s a handy list of the tools you’ll need:
- Socket Wrench Set & Extensions – Most GE washers use a 7/16″ bolt to hold the agitator in place. A socket wrench makes removing it simple & fast.
- Screwdrivers (Flathead & Phillips) – Useful for removing the fabric softener dispenser & any covers.
- Pliers – Perfect for gripping stubborn parts or small clips.
- Strap Wrench – Handy for lifting the agitator if it’s stuck. It prevents damage while giving you extra leverage.
Materials You Might Need
Apart from tools, having a few materials ready can make the process smoother:
- Replacement Agitator Dogs – These small parts wear out over time & affect how your washer moves clothes.
- Lubricant (like petroleum jelly) – Helps with the agitator spline, making it easier to remove & reinstall parts.
- Clean Cloth or Towel – To catch any drips & clean debris around the drum.
Optional Items for Stubborn Situations
Sometimes, an agitator can be stuck or difficult to lift. Consider having these extras just in case:
- Penetrating Oil (like WD-40) – Loosens corroded bolts or stubborn parts.
- Rubber Mallet – Gentle taps can help loosen a tight agitator without causing damage.
Why Preparation Saves Time & Stress
By gathering all tools & materials before you start, you avoid stopping midway to search for something. It keeps the process smooth & helps you stay focused on learning how to remove agitator from GE washer safely & effectively. Plus, having everything at hand makes the whole project feel achievable—even for a beginner.
Identifying Your GE Washer Model
Why Knowing Your Model Matters
Before you dive into how to remove agitator from GE washer, it’s important to know exactly which model you’re working with. GE washers can have slight design differences, which affect how you remove the agitator. Knowing your model ensures you follow the right steps, avoid mistakes, & make the process faster and safer.
Finding the Model Number
Most GE washers have a model number located on the washer cabinet, near the door or lid. Here’s how to find it:
- Check Inside the Door or Lid – Open the lid and look on the top or side panel.
- Look on the Back of the Washer – Sometimes the model number is on a sticker on the back.
- Consult Your Manual – If you still have the manual, the model number will be listed on the front page or specifications section.
Understanding the Differences
Once you know your model, you can identify if your washer has a:
- Single-action agitator – Spins in one direction only, simpler to remove.
- Dual-action agitator – Spins in both directions, may have extra parts like a fabric softener dispenser built-in.
Knowing these differences helps you anticipate any tricky spots when learning how to remove agitator from GE washer.
Why This Step Saves You Time & Hassle
Trying to remove the agitator without knowing your model can lead to confusion, broken parts, or a longer repair. By taking a few minutes to identify your washer model, you’re setting yourself up for a smooth, frustration-free experience.
Quick Tip
Take a photo of the model number with your phone. This way, you can easily reference it if you need online guides or replacement parts while working on your washer.
Step-by-Step Guide to Removing the Agitator
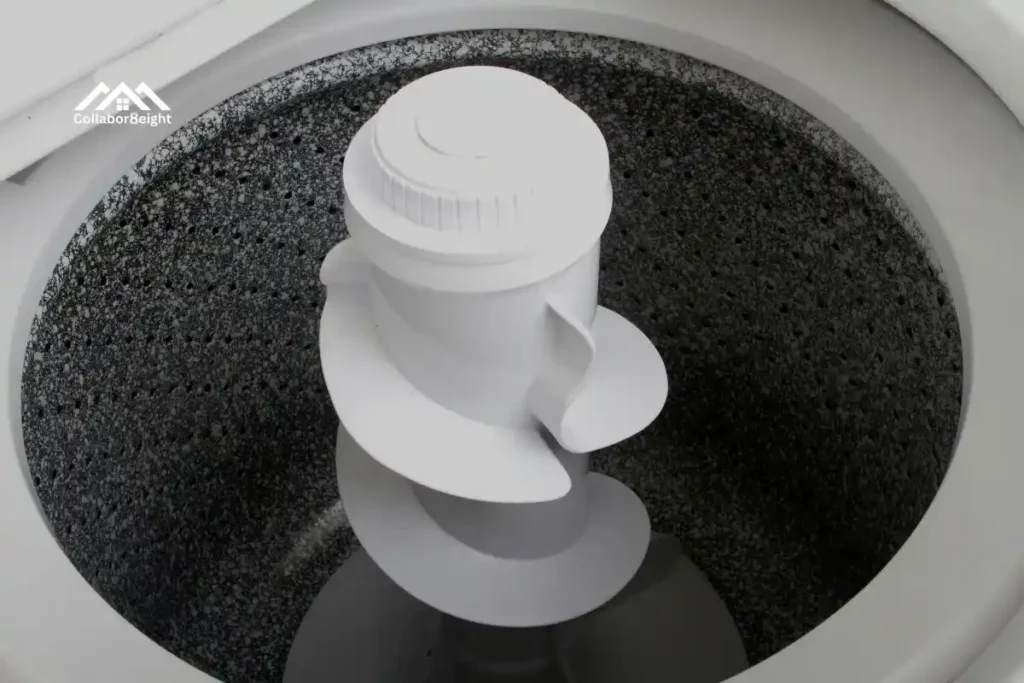
Step 1: Remove the Fabric Softener Dispenser
Most GE washers have a fabric softener dispenser sitting on top of the agitator. To start how to remove agitator from GE washer, simply pull the dispenser straight up. Don’t force it—if it’s snug, gently wiggle it until it lifts off. This exposes the agitator bolt underneath, ready for the next step.
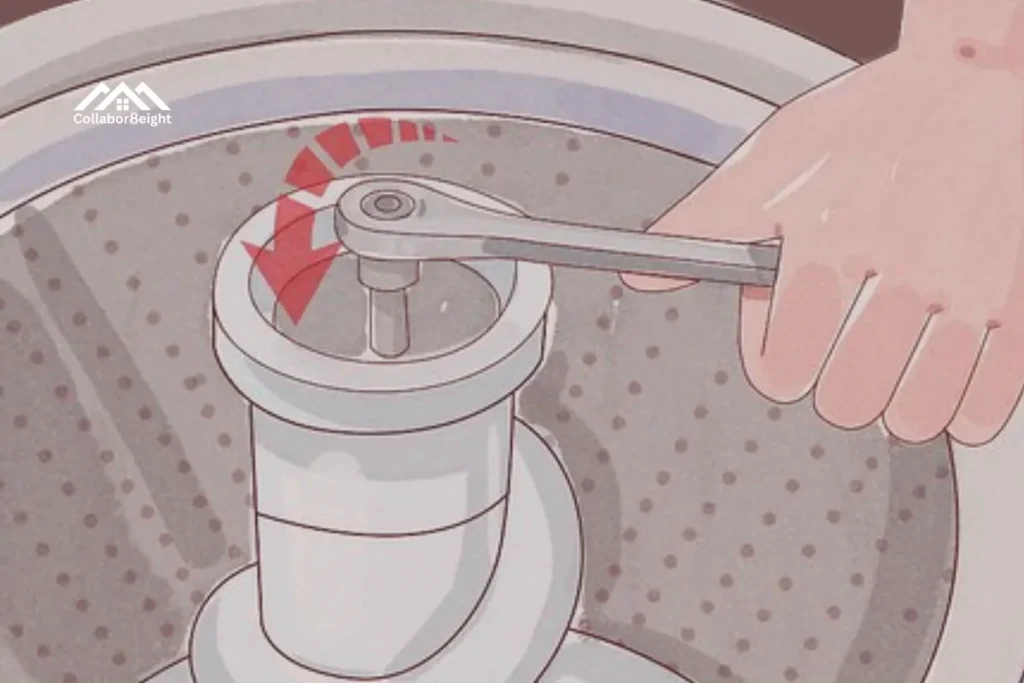
Step 2: Unscrew the Agitator Bolt
Now that the bolt is visible, use a 7/16″ socket wrench to loosen and remove it. Some washers may have a cover over the bolt; if so, remove it first. Keep the bolt somewhere safe—you’ll need it for reassembly. Pro tip: if the bolt feels stuck, apply a small amount of penetrating oil and wait a few minutes.
Step 3: Lift the Agitator Out
With the bolt removed, it’s time to pull out the agitator. Grab the base firmly & lift straight up. If it’s stuck, a gentle rocking motion or a strap wrench can help. Remember, don’t use excessive force; you don’t want to damage the drum or the agitator.
Step 4: Separate Agitator Components (If Needed)
Some GE washers have agitators with multiple parts, including upper & lower sections. Carefully separate these if your model requires it. Inspect the agitator dogs and other components for wear. Replacing worn parts now will save headaches later.
Step 5: Inspect & Clean
Once removed, check for debris, soap buildup, or broken parts. Clean the agitator and the drum thoroughly. This simple step improves washer performance & prevents future issues.
Step 6: Keep Everything Organized
Lay out the agitator, bolt, and any small parts neatly. This makes reassembly easier and reduces the chance of losing anything. Taking photos as you go can help if you need visual guidance later.
Inspecting & Cleaning the Agitator
Why Inspection Is Important
After removing the agitator, knowing how to remove agitator from GE washer isn’t enough—you also need to inspect it. Checking for wear & tear, buildup, or broken parts ensures your washer works efficiently and prevents future problems. A small issue now can save you a bigger repair later.
Check the Agitator Dogs
Inside your agitator are small parts called agitator dogs. These tiny components help your agitator spin properly. Over time, they can wear out or break, causing your washer to spin unevenly or make strange noises. Inspect them carefully—if they look worn or damaged, it’s time to replace them.
Remove Soap & Debris Buildup
Over months of washing, soap, fabric softener, and lint can build up inside your agitator. Use a cloth or an old toothbrush to scrub away residue. Cleaning these areas improves performance and prevents unpleasant odors.
Clean the Drum & Surrounding Area
Don’t forget to clean the drum where the agitator sits. Wipe away any grime, lint, or buildup. A clean drum ensures your washer operates smoothly and helps clothes get cleaner during each cycle.
Lubricate Moving Parts (Optional)
If your agitator has a spline or other moving parts, a small amount of petroleum jelly or recommended lubricant can make reassembly smoother. This extra step makes your washer run quietly and efficiently.
Organize Parts for Reassembly
After cleaning, lay out the agitator, bolt, and any removed components in order. This organization makes reinstallation simple and prevents losing small parts. Taking a quick photo before reassembly is a helpful visual guide.
Troubleshooting Common Issues
Stubborn Agitator Won’t Move
Sometimes, even after removing the bolt, the agitator can be stuck. If this happens while learning how to remove agitator from GE washer, don’t panic. Use a strap wrench to gently lift it, or give it a slight twist while pulling upward. Avoid excessive force to prevent damaging the drum or agitator.
Corroded or Stripped Bolt
If the agitator bolt is rusty or stripped, it can be frustrating. Apply a small amount of penetrating oil like WD-40 and wait 5–10 minutes before trying again. Using the right socket size ensures the bolt comes out smoothly.
Agitator Dogs Are Worn or Broken
Worn agitator dogs can cause your washer to spin unevenly or make clicking noises. Inspect them closely while removing the agitator. If needed, replace them before reassembly to restore smooth operation.
Agitator Spins but Clothes Aren’t Moving
If your washer agitator spins but doesn’t move clothes, it could be a sign of worn internal components. Checking and replacing agitator dogs or other worn parts while removing the agitator fixes this problem efficiently.
Agitator Makes Noise During Spin
Noise is often caused by debris, buildup, or worn parts. Cleaning the agitator & drum, lubricating moving components, and inspecting for broken agitator dogs usually resolves the issue.
Tips to Avoid Problems in the Future
- Clean your washer regularly to prevent buildup.
- Inspect agitator dogs annually and replace if worn.
- Avoid overloading the washer, which puts extra stress on the agitator.
Reassembly & Testing
Step 1: Organize Your Parts
Before starting reassembly, lay out all the components you removed: the agitator, bolt, agitator dogs, and any covers. Organizing everything ensures you don’t lose small parts & makes the process smoother when learning how to remove agitator from GE washer.
Step 2: Reinstall Agitator Components
If your GE washer has multiple agitator parts, begin by reassembling them in the correct order. Place the agitator dogs & any moving components back inside the agitator. Make sure everything fits snugly & spins freely.
Step 3: Position the Agitator in the Drum
Carefully lower the agitator back into the drum. Align it with the central post so it sits properly. You shouldn’t have to force it; if it’s stuck, double-check that everything inside is aligned correctly.
Step 4: Secure the Agitator Bolt
Once the agitator is in place, use your 7/16″ socket wrench to tighten the bolt. Make sure it’s secure but don’t overtighten—it should hold firmly without risking damage.
Step 5: Replace the Fabric Softener Dispenser
If your washer has a fabric softener dispenser, place it back on top of the agitator. Press it down gently until it clicks into place.
Step 6: Test Your GE Washer
Plug the washer back in & run a short test cycle. Watch the agitator spin & listen for any unusual noises. Your washer should operate smoothly, and clothes should move freely during the cycle.
Step 7: Make Adjustments if Needed
If you notice the agitator wobbling, making noise, or not moving clothes properly, double-check the bolt, agitator dogs, & alignment. Small tweaks now can prevent bigger issues later.
Quick Tip
Take a photo of your completed reassembly for future reference. It can save time if you ever need to remove the agitator again.
Preventive Maintenance Tips

Why Preventive Maintenance Matters
Knowing how to remove agitator from GE washer is only part of the story. Preventive maintenance keeps your washer running smoothly for years, prevents costly repairs, & ensures your clothes come out clean every time. Spending a few minutes now saves hours of frustration later.
Clean the Agitator & Drum Regularly
Even when your washer is working fine, debris, soap scum, & fabric softener can build up inside the agitator & drum. Cleaning these areas every few months improves performance & reduces odors.
Inspect Agitator Dogs & Components
Check your agitator dogs & other moving parts periodically. Replacing worn components before they break keeps the agitator spinning smoothly & prevents uneven washing.
Use the Right Detergent & Amount
Overusing detergent or using the wrong type can cause buildup inside the agitator. Follow the detergent guidelines for your GE washer to maintain optimal performance & prevent clogs.
Avoid Overloading the Washer
Packing the washer too full puts extra strain on the agitator & motor. Washing smaller loads ensures the agitator moves freely & your clothes get cleaned properly.
Lubricate Moving Parts When Needed
If your agitator has a spline or other moving components, a small amount of lubricant, like petroleum jelly, can keep everything spinning smoothly. This helps prevent wear & tear over time.
Check Hoses & Connections
While you’re inspecting the agitator, take a moment to check hoses, seals, & connections. Tightening loose parts or replacing worn hoses prevents leaks & future damage.
Schedule Periodic Deep Cleaning
Once or twice a year, run a washer cleaning cycle or a vinegar-based cleaning routine to remove hidden buildup. This keeps your washer fresh & prevents small problems from becoming major issues.
Final Thought
Knowing how to remove agitator from GE washer makes maintenance simple & keeps your washer running smoothly. With the right tools, careful steps, & a little cleaning, you can save time, money, & extend the life of your washer. Take control of your laundry routine, follow this guide, & enjoy a more efficient, worry-free washer.
FAQs
Can I Remove the Agitator Without Tools?
While it might be tempting to try, removing an agitator without proper tools is usually difficult. For most GE washers, a socket wrench, pliers, & sometimes a strap wrench are needed. Learning how to remove agitator from GE washer safely without tools can be frustrating & may damage the washer.
How Often Should I Inspect Agitator Dogs?
Agitator dogs wear down over time, which can affect washing performance. Check them every 6–12 months or whenever your washer seems noisy or clothes aren’t moving properly. Regular inspection keeps your washer running smoothly.
Is Professional Help Necessary?
Not usually. Most homeowners can remove & clean their agitator with the right instructions. However, if the agitator is severely stuck, bolts are stripped, or you notice internal damage, calling a professional ensures your washer isn’t accidentally damaged.
Can Removing the Agitator Void the Warranty?
It depends on your washer’s warranty terms. Generally, removing the agitator for cleaning or maintenance doesn’t void a standard warranty, but replacing parts yourself may. Always check your GE washer’s manual before attempting repairs.
How Long Should It Take to Remove & Clean the Agitator?
For most users, the entire process—removal, inspection, cleaning, & reassembly—can take 30–60 minutes, depending on your familiarity with the washer. Taking your time ensures safety & reduces the chance of errors.
Can I Remove the Agitator from All GE Washer Models the Same Way?
While most top-load GE washers follow similar steps, slight variations exist between models. Always locate your GE washer model number and consult your manual for any specific instructions before removing the agitator.